

For zoom in/out use the scroll wheel on mouse.
High Beam Auxiliary LED Lights
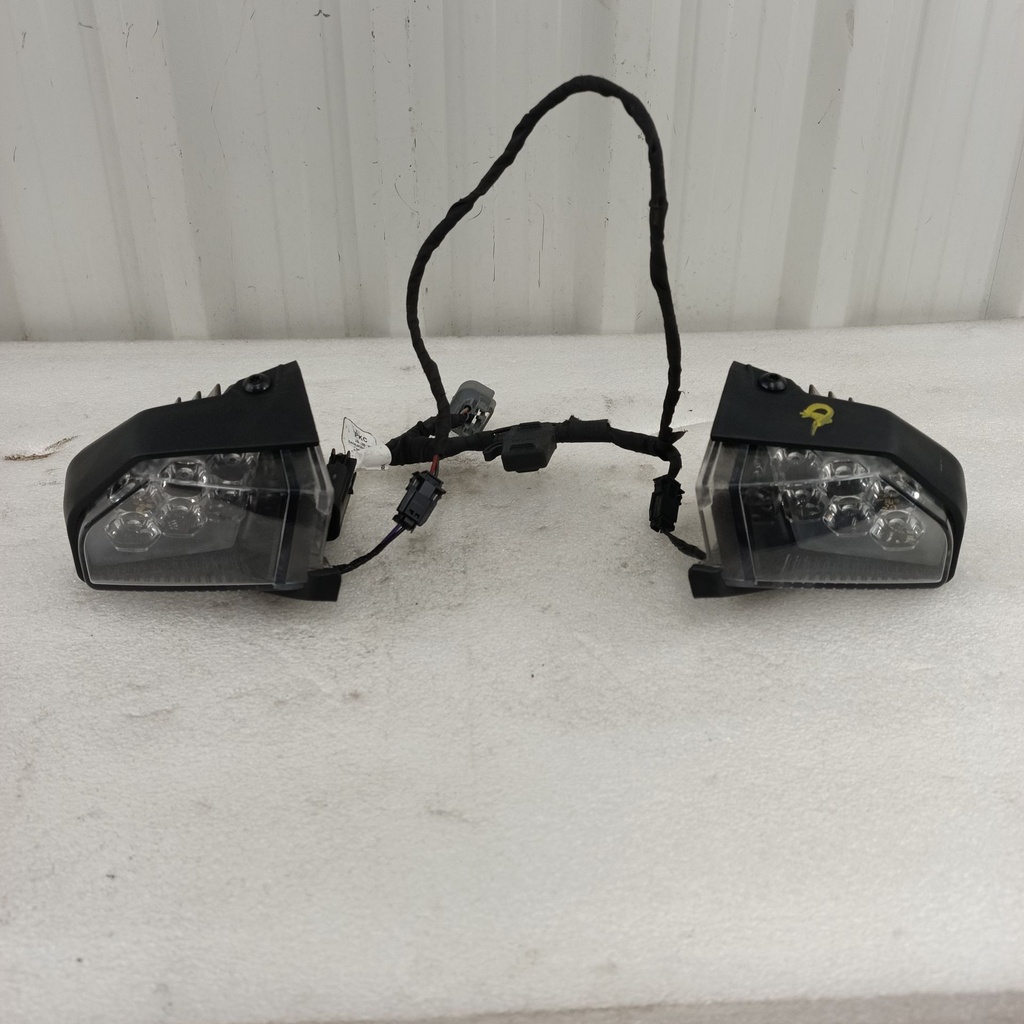
[860201651]
Product description
- Increases considerably the stock high beam output.
- Light covers more distance for great night visibility.
- Works with existing Auxillary LED Lights (860201818, 860201650).
- Not compatible with One-Piece Lightweight Hood
parts to be installed
| ITEM | DESCRIPTION | Part number | QTY |
| P1 | Left light assembly | Not available separately | 1 |
| P2 | Right light assembly | Not available separately | 1 |
| P3 | Left clip | 515178418 | 1 NO INC |
| P4 | Right clip | 515178419 | 1 NO INC |
| P5 | Electric light harness | Not available separately | 1 |
| P6A | Ski-Doo Plate | Not available separately | 2 |
| P6B | Lynx Plate | Not available separately | 2 |
| P7 | K40 X 16 Flanged Torx screw | 250000287 | 4 |
| P8 | K40 X 25 Hexagonal flanged screw | 241142560 | 2 |
instructionsVehicle preparationPlace your hands on each side of windshield.Pull the windshield until its pins come out of rubber grommets then pull in the center to remove center pin from grommet.Open storage cover until it is almost vertical.Pull out storage cover.
Remove the gauge support screws.
Trail and crossover models shownRemove storage compartment.
1. Storage compartementPart InstallationInstall left clip [P3] and secure it with a K40 X 25 hexagonal flanged screw [P8]. Tighten to specification.
1. K40 X 25 Hexagonal flanged screw [P8]2. Left clip
| Tightening Torque | |
|---|---|
| K40 X 25 hexagonal flanged screw [P8] | 1.5 to 2 N•m (13.3 to 17.7 lbf•in) |
Drill three 3 mm (1/8 in) holes as shown on picture.Tear and discard the part of left clip used as a template.
1. Tear and discard templateDrill one 11.5 mm (7/16 in) hole and two 5.5 mm (7/32 in) holes to enlarge the three holes previously drilled.
Slide left light assembly [P1] onto left clip [P3]. Ensure to pass light wire through 11.5 mm hole.
1. Left clip2. Left light assembly [P1]
1. Light wireSecure left light assembly [P1] using one plate [P6A] for Ski-Doo models or [P6B] for Lynx models and two K40 X 16 flanged Torx screw [P7]. Tighten to specification.
1. Ski-Doo Plate [P6A]2. Two K40 X 16 flanged Torx screw [P7]
1. Lynx Plate [P6B]2. Two K40 X 16 flanged Torx screw [P7]
| Tightening Torque | |
|---|---|
| K40 X 16 flanged Torx screw [P7] | 1.5 to 2 N•m (13.3 to 17.7 lbf•in) |
Repeat every steps from PART INSTALLATION up to this point for RH side.Unplug left light connector of the vehicle.1. Left light connector of the vehicle- Plug vehicle light connector of electrical light harness [P5] in left light connector port of the vehicle.- Plug both light assembly [P1] and [P2] to electrical light harness [P5].- Plug left light connector of the vehicle in the last connector of electrical light harness [P5].
1. Vehicle light connector of electrical light harness [P5]2. Electrical light harness [P5] auxiliary light connector.3. Left light assembly [P1]4. Right light assembly [P2]5. Left light connector of vehicle6. Last connector of electrical light harness [P5]The installation is the reverse of removal procedure. However pay attention to the following :Storage Compartment Cover NOTICE Ensure windshield is NOT installed. Otherwise, the storage cover could be damaged during installation.Windshield1. Lubricate the windshield grommets using soapsuds. NOTICE Do not lubricate grommets with any type of grease.2. Secure windshield by inserting the windshield pins into the grommets.NOTE: Make sure not to push grommets through gauge support holes.
1. Windshield tab2. Gauge support front grommet
WARNINGMake sure that handlebar turns freely in both directions. Make sure that there is no contact at any time between handlebar wind deflectors (if so equipped) and windshield.